Digital Photography & imaging [Week 7]
11.16.2023 / week 7
Sheryne Axellia Putri / 0367267 / Bachelor of Design (Honours) in Creative MediaDigital Photography & Imaging
Week 7 11.16.2023 - Double Exposure & Image Blending
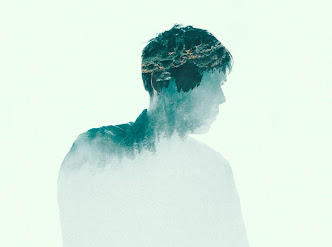
- Double exposure in photography refers to merging multiple images. The goal is to make them surreal, emotional, or humorous. They usually feature silhouettes.
 |
| Figure 1.1 Week 7 (11/09/2023) Double exposure. |
1. Using the Tilt-Shift effect
If you want to be extra creative, blur one of your photos instead of the entire image. Or blur everything except for one important detail. To add this feature, go to Filter > Blur Gallery > Tilt-Shift.
 |
| Figure 1.2 Week 7 (11/09/2023) Tilt-shift effect. |
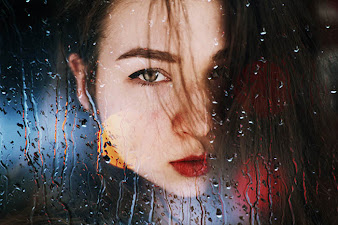
2. Create a fake reflection
There are many ways you can create reflections. One of them is creating a double exposure with the help of a separate window photo. This is an example of the main subject surface with raindrops and bokeh. This helps to add interesting textures to multiple-exposure photography.
 |
| Figure 1.3 Week 7 (11/09/2023) Fake reflection. |
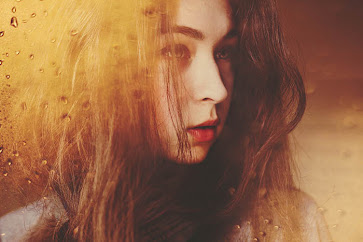
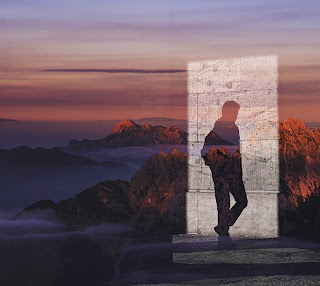
3. Experiment with simple portraits and textured details
Combining something plain with something complicated will give you a balanced result. It will also save a lot of simple photos that you might discard.
 |
| Figure 1.4 Week 7 (11/09/2023) Portrait & texture. |
4. Convert your results to Black & White
A lack of color will strengthen the emotions in your double-exposure images. If you want to express your work in a vulnerable way, experiment with this. It gives them a unique depth and allows you to experiment with something interesting just like film photography.
 |
| Figure 1.5 Week 7 (11/09/2023) B&W in double exposure. |
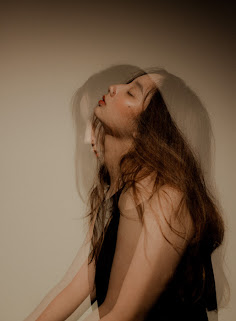
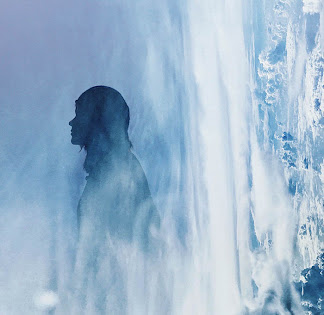
5. Work with silhouette
Try silhouettes of yourself, other people, or random objects. Anything else that catches your eye can create unique composite images.
 |
| Figure 1.6 Week 7 (11/09/2023) Sillhouete. |
6. Pick a random photo
A random process doesn’t mean it’s not meaningful. Your results might create a story of their own, one that others will find encouraging. A lot of double-exposure photography was a happy accident. But they led to great feedback and even greater creative growth.
 |
| Figure 1.7 Week 7 (11/09/2023) use random photos and subject/object. |
7. Make simple objects look fascinating
Take photos of everyday objects you usually take for granted. Try to make them look like something else. A silhouette of a dull-looking building could become the outline of a starry sky like the photo below. This technique will enhance your imagination.
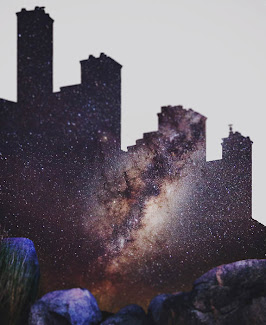 |
| Figure 1.8 Week 7 (11/09/2023) use simple objects. |
8. Use shadows
Outlines of any kind are fantastic to work with for double-exposure photography. Shadows are as effective as silhouettes in this genre. They’re fascinating to work with. Take a photo of someone’s shadow and transform it into a story.
 |
| Figure 1.9 Week 7 (11/09/2023) use shadows. |
- Blend Modes, Working with blend modes is almost always an experimental process. you always seem to end up experimenting with different modes and Fill Opacities until you get the results you’re looking for.
 |
| Figure 1.10 Week 7 (11/09/2023) Blend mode groups. |
Darken: The result darkens the image. White is invisible on the Blend layer.
Lighten: The result lightens the image. Black is invisible on the Blend Layer.
Contrast: Increases Contrast. 50% gray is invisible on the blend layer.
Comparative: The difference between images is apparent, this makes them useful for working with different layers
Color: Works on different color qualities
 |
| Figure 1.11 Week 7 (11/09/2023) Commonly used blend modes. |
Keyboard shortcuts, to use these shortcuts, your current tool must be something other than one of the tools found in the painting and editing section of the Tools Panel.
For example, if you use Shift+Option+M to switch to the Multiply blend mode while you have the Paint tool selected, the Paint tool’s blend mode will be changed to Multiply, not the blend mode option in the Layers Panel.
 |
| Figure 1.12 Week 7 (11/09/2023) Keyboard shortcuts #1. |
 |
| Figure 1.13 Week 7 (11/09/2023) Keyboard shortcuts #2. |
 |
| Figure 1.14 Week 7 (11/09/2023) Opposite blend modes. |
A quick guide:
- Select the Layer 1 (Fire) to be on top of the Background (Musicians)
- Go to the Blending Modes option
- Select “Screen”
- As a result, all of the pixels on the fire will be selected as Screen blending mode.
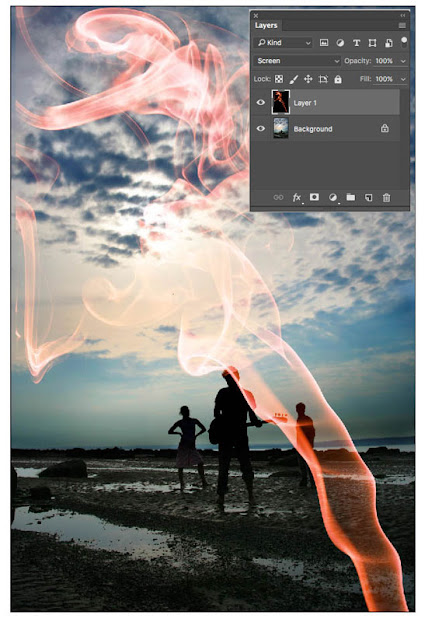 |
| Figure 1.15 Week 7 (11/09/2023) How to use screen blend modes. |
Week 7 11.16.2023 - Double Exposure & Image Blending
INSTRUCTION:
Follow the week 7 Tutorial Demo (DOUBLE EXPOSURE)
Download the images that are provided.
Attach the Project 2A: Double Exposure - Part 1 (Double exposure follow tutorial)
Attach the Project 2A: Double Exposure - Part 2 (My own double exposure)
Part #1 (Double exposure follow tutorial)
.jpeg) |
| Figure 2.1 Week 7 (11/09/2023) The B&W Portrait #1. |
 |
| Figure 2.2 Week 7 (11/09/2023) The progress & layers #1. |
 |
| Figure 2.3 Week 7 (11/09/2023) Double exposure follow tutorial (without filter). |
 |
| Figure 2.4 Week 7 (11/09/2023) adjusting the color filter. |

Part #2 (My own double exposure)

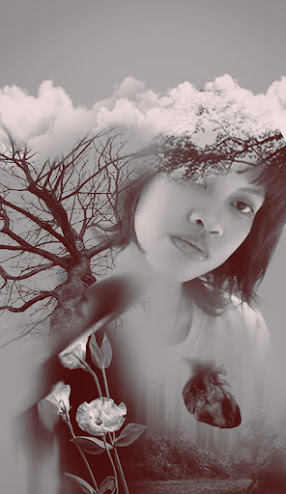 |
| Figure 2.7 Week 7 (11/09/2023) My own double exposure. |
REFLECTION
Experience
Try to experiment with different images, blend modes, and compositions. Photoshop provides various tools and options, so take the time to explore and study to achieve the desired result. And ensure that the resolution and image quality of the source images are suitable for the final output. Maintaining high-quality images helps avoid pixelation or loss of detail in the double exposure.
Observation
Adjust the contrast and brightness of each image before combining them. This helps me to create a more balanced and visually appealing double exposure effect. Adjusting the opacity of each layer to control the intensity of the double exposure effect to find the right balance ensures that both images contribute to the overall composition.
Findings
Pay attention to the silhouette of the subjects in the images. A well-defined silhouette in one of the images can enhance the overall impact of the double exposure. Consider the level of detail in each image. Images with varying levels of detail can create a dynamic and interesting composition.


Comments
Post a Comment