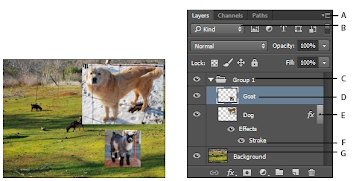
Layers are useful because they let you add components to an image and work on them one at a time, without permanently changing your original image. For each layer, you can adjust color and brightness, apply special effects, reposition layer content, specify opacity and blending values, and so on. You can also rearrange the stacking order, link layers to work on them simultaneously, and create web animations with layers.
Layers are like stacked, transparent sheets of glass on which you can paint images. You can see through the transparent areas of a layer to the layers below. You can work on each layer independently, experimenting to create the effect you want. Each layer remains independent until you combine (merge) the layers.
Figure 1.1 Week 3 (10/26/2023) Layers in Photoshop.
There are several other layer types you can use to create special effects:
Fill layers → Contain a color gradient, solid color, or pattern.
Adjustment layers→ Enable you to fine-tune color, brightness, and saturation without making permanent changes to your image (until you flatten, or collapse the adjustment layer).
Type layers and shape layers→ Let you create vector-based text and shapes.
The advantage of using Layers is that you can save a Photoshop file with all the layers included. This means you can use layers for non-destructive editing. Your adjustments in Photoshop will never destroy the original image. The layers contain all the extra information and/ or images you want to add to the original file.
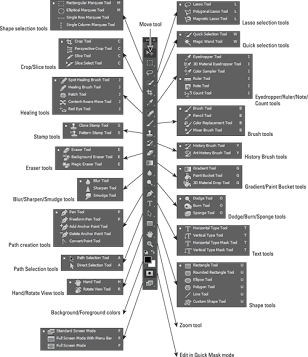
Tool Box.
Photoshop provides several tool sets in the Toolbox, and you can expand the tool sets to reveal additional tools↷
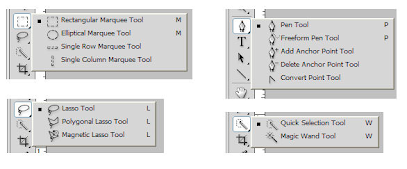
Marquee tool is the basic selection tool that can select your Photoshop layer in several shapes, like rectangle, ellipse, single-pixel vertical and horizontal line, square, and circle, etc. By default, the marquee tool makes the rectangular selection.
The Lasso Tool → allows you to draw and pinpoint specific areas of a document.
When you click on the Lasso Tool from the Toolbar, you will see three different tool options:
Lasso, Polygonal Lasso, and Magnetic Lasso.
Figure 1.4 Week 3 (10/26/2023) The lasso tool (1).
In the image below, the magenta dots symbolize the start and end points where I released the mouse button. As you can see, Photoshop draws a straight line between points to finish my selection.
Figure 1.5 Week 3 (10/19/2023) The lasso tool (2).
Polygonal Lasso Tool, you will quickly notice that the Polygonal Lasso only draws straight lines between your points. When you press and hold the Shift key you can create 45-degree angles. To close a selection, you can either hit the Enter key or connect your first point to your last point — you will notice the icon symbol will change to a lasso and small circle once the selection is ready to be closed. If you want to erase a point as you’re making a selection, you can hit the Delete key.
Figure 1.6 Week 3 (10/19/2023) The Polygonal lasso tool.
This tool is great for selecting straight objects such as buildings.
Magnetic Lasso, this tool is quite different from the other two and can be a little frustrating when you use it for the first time. The Magnetic Lasso detects an object’s edge and automatically snaps alongside it while you are moving near it.
Figure 1.7 Week 3 (10/19/2023) The Magnetic lasso tool.
We will take a closer look at the menu bar which has 3 additional options for this tool:
Width → defines how close you want to stay to an edge while tracing it.
Contrast → helps you fine-tune the detection of the edge.
Frequency→ defines how many points will be created along the edge.
Figure 1.8 Week 3 (10/19/2023) The Magnetic lasso tool (2).
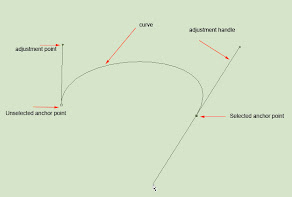
The pen tool is the way that you add these points and the way you drag the tool as you create the points determines how they will look. Remember, the fewer points, the smoother a path will be.
Figure 1.9 Week 3 (10/19/2023) The pen tool.
TUTORIAL
DEMO: 1. Blending Mode
2. Paths.
3. Masking.
4. Layering.
PROJECT 1B: DIGITAL COLLAGE - briefing
Figure 1.10 Week 3 (10/19/2023) Tutorial for digital collage.
Figure 1.11 Week 3 (10/19/2023) Photoshop demo.
Figure 1.12 Week 3 (10/19/2023) Layers.
PRACTICAL
Week 3 10.26.2023 - Introduction to Photoshop 2
INSTRUCTION:
1. Download all of the images that are provided to your computer.
2. Follow the tutorial demo as a reference to create your digital collage.
3. Create 3 different composition digital collages from the images that you’ve downloaded.
4. Create an A4 canvas size (vertical) in Photoshop and start to do the compositions.
5. Take 3 photos of your digital collage compositions and insert them in the section below.
1. Composition #1
Figure 2.1 Week 3 (10/19/2023) Making the fire using the Pen tool.
Figure 2.2 Week 3 (10/19/2023) The layers.
Figure 2.3 Week 3 (10/19/2023) Composition #1.
2. Composition #2
Figure 2.4 Week 3 (10/19/2023) The layers.
Figure 2.5 Week 3 (10/19/2023) Composition #2.
3. Composition #3
Figure 2.6 Week 3 (10/19/2023) The layers.
Figure 2.7 Week 3 (10/19/2023) Composition #3.
REFLECTION
Experience
For a digital collage, I find it more fitting for it to be clean and structured rather than a physical collage. Physical collage can be abstract and messy yet still charms in its own way. I struggled to think about the composition in digital collage than the physical collage.
Observation
Digital collage doesn't require more time and effort to edit, it can be edited and resized as desired, making the process much faster and efficient. Physical collages are made of real materials while digital collages are made using digital file formats and software.
Findings
Texture can be an important element in digital collage, it adds depth and dimension to the composition. Using texture is a way to add an extra layer of dynamic and visual interest to a digital collage.
23.04.2025 - 25.06.2025 week 1 - week 14 Sheryne Axellia Putri / 0367267 / Bachelor of Design (Honours) in Creative Media Creative Brand Strategy Project 4 Quick Links Project 1 Project 2 Project 3 INSTRUCTIONS Project 1 1A: Case Study You are to analyse a well-established Rebranding Campaign of your choosing. 1. Identifying its brand strategy: The Brand Story, Objective & Purpose, Brand Values, Vision & Mission, Target Audience, Brand Positioning. 2. Understanding its brand experience: features and activities. 3. Reviewing its key visuals and the applications: identity and usage from different platforms. 1B: Campaign Proposal You are to propose a Branding Campaign. The campaign will be for a snack of your choosing and may be conceptualised as a rebranding exercise to introduce a new concept or as a new product line launch. ...
24 .04.2025 - 04.07.2025 week 1 - week 11 Sheryne Axellia Putri / 0367267 / Bachelor of Design (Honours) in Creative Media Packaging & Merchandising Design Final Project TABLE OF CONTENTS 1. Instructions 2. Feedback 3. Reflection LECTURES *All lectures are noted in exercise blog. INSTRUCTIONS Final Project Students will build upon the existing packaging design and food product to create a cohesive brand experience through merchandise and promotional initiatives. They will identify opportunities to enhance brand visibility, attract new customers, and foster brand loyalty by designing merchandise items and implementing promotional strategies tailored to the target audience and market context. Students will be required to create FIVE (5) merchandise items, including a POP Display based on Project...
23 .04.2025 - ..2025 week 1 - week 14 Sheryne Axellia Putri / 0367267 / Bachelor of Design (Honours) in Creative Media Publishing Design Exercises TABLE OF CONTENTS 1. Lectures 2. Instructions 1.1 Progress - Writing 2.1 Progress - Illustrations 3.1 Progress - Book 4.1 Progress - Ebook Final Submission 3. Feedback 4. Reflection LECTURES Week 1 23.04.2025_Format There are many forms of publication: books, magazines, and newspapers. Keep in mind that when you design for publication, you have to think of the mass audience. For this semester, we focus on the book format, one of the most important and influential formats. And most important advances in publishing were centered around the book. The Book The book is a medium to document and transmit ideas, knowledge, records, history, and so much ...


Comments
Post a Comment