Digital Photography & imaging [Week 5]
11.02.2023 / week 5
Sheryne Axellia Putri / 0367267 / Bachelor of Design (Honours) in Creative MediaDigital Photography & Imaging
Week 5 11.02.2023 - Digital photography
Exposure setting⟶ in photography, exposure is the amount of light that reaches your camera sensor or film.
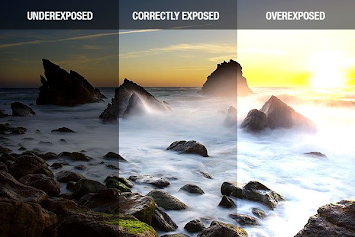 |
| Figure 1.1 Week 5 (11/02/2023) Exposure setting. |
The main parts of the camera:
1. Camera body:
- Shutter- Image sensor
- LCD screen
2. Camera lens:
- Aperture/ Iris
The camera body is a light-proof box.
 |
| Figure 1.2 Week 5 (11/02/2023) Anatomy of the camera body. |
Only two camera settings affect the actual “luminous exposure” of an image: shutter speed and aperture. The third setting, camera ISO, also affects the brightness of your photos.
Iris
Shutter Speed
ISO
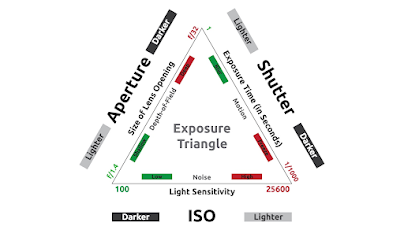 |
| Figure 1.3 Week 5 (11/02/2023) Exposure triangle. |
1. Iris/Aperture, controls the flow of light entering the lens.
 |
| Figure 1.4 Week 5 (11/02/2023) Iris/Aperture. |
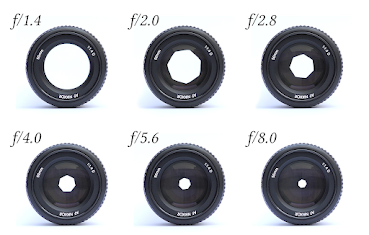
Iris/Aperture is measured by f-stop, indicated by the sequence of f-number: f/1, f/1.4, f/2, f/ 2.8, f/ 4, f/ 5.6, f/ 8, f/ 11, f/ 16, f/22, f/32. (The lower the f-number, the larger the lens opening.)
 |
| Figure 1.5 Week 5 (11/02/2023) f-number. |
2. The shutter, is a small plastic sheet that opens and closes to allow light onto the film or prevent light from reaching the film.
 |
| Figure 1.6 Week 5 (11/02/2023) The shutter. |
Shutter speed is measured in seconds: 1/1000 s,1/500 s,1/250 s,1/125 s,1/60 s,1/30 s,1/15 s,1/8 s,1/4 s,1/2 s,1 s, 2 s, 3 s.
 |
| Figure 1.7 Week 5 (11/02/2023) Shutter speed. |
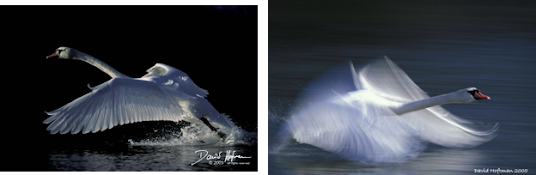 |
| Figure 1.8 Week 5 (11/02/2023) The use of shutter speed. |
3. ISO, originally referred to film's sensitivity, and its "light gathering" ability. For digital photography, ISO refers to the sensitivity and the signal gain of the camera's sensor.
The common ISO camera settings are: 100, 200, 400, 640, 800, 1600, 3200, 6400
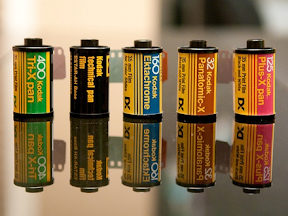 |
| Figure 1.9 Week 5 (11/02/2023) ISO camera setting. |
The lower the number of ISO the less sensitive your camera is to light and the finer the grain.
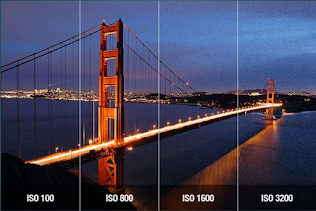 |
| Figure 1.10 Week 5 (11/02/2023) The use of ISO in different settings. |
- Lens Perspective, there are wide-angle lenses, standard lenses, and telelenses.
| Figure 1.11 Week 5 (11/02/2023) Types of camera lenses #1. |
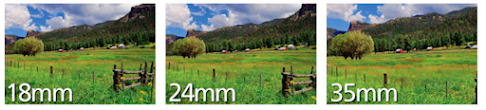
Different lenses are designed for different for different purposes. Lenses can be categorized by focal length. The shorter the focal length, the wider the angle of view, and vice-versa.
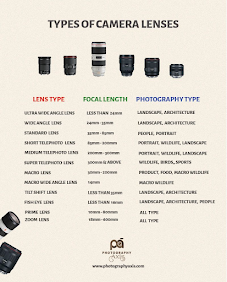 |
| Figure 1.12 Week 5 (11/02/2023) types of camera lenses #2. |
Focal length, is the measurement (in millimeters) from the optical center of a camera lens to the camera’s sensor.
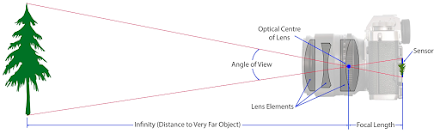 |
| Figure 1.13 Week 5 (11/02/2023) Focal length. |
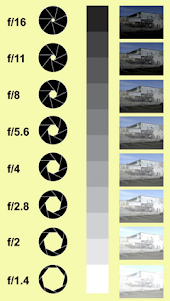
Depth of field, is the proportion of the image that is reasonably sharp and in focus. The smaller the aperture you use, the greater the depth of field.
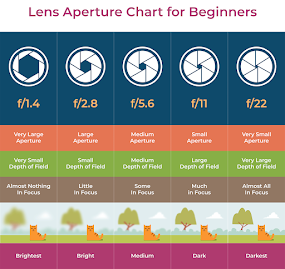 |
| Figure 1.14 Week 5 (11/02/2023) Lens aperture chart. |
Wide-angle lens, is especially useful for landscape photography or street photography. With wide-angle lenses, almost everything is in focus, unless your subject is very close to the lens. Wide-angle lenses are ideal for fitting a large area into your frame.
 |
| Figure 1.15 Week 5 (11/02/2023) wide-angle lens used in landscape photography. |
Tele-lenses, allow you to photograph subjects from a distance thanks to their magnification.
Telelenses are great for isolating a subject that is far away.
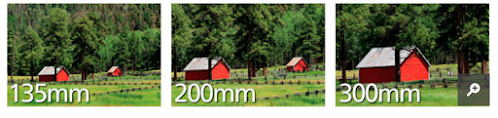 |
| Figure 1.16 Week 5 (11/02/2023) Tele-lenses used for subjects from a distance. |
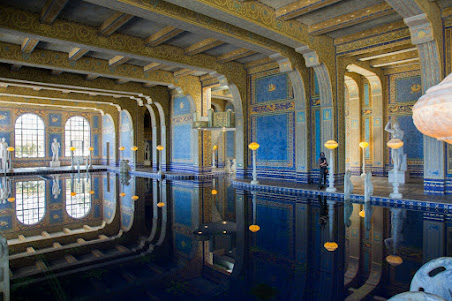
Follow this quick tutorial to understand how to use:
Quick Selection Tool
Layer Mask
Filters
Color Correction
| Figure 1.17 Week 5 (11/02/2023) Tutorial for Hearst mansion. |
Week 5 11.02.2023 - Digital photography

| Figure 2.1 Week 5 (11/02/2023) Placing Shazam on the background that was instructed. |

| Figure 2.2 Week 5 (11/02/2023) Hearst mansion #1 Shazam. |

| Figure 2.3 Week 5 (11/02/2023) Using the Quick Selection tool. |

| Figure 2.4 Week 5 (11/02/2023) Placed on the background that was instructed. |
| Figure 2.5 Week 5 (11/02/2023) Hearst mansion #2 my reflection. |
REFLECTION


Comments
Post a Comment