Interactive Design [Project 1 : Digital Resume/CV]
14.05.2024 - 28.05.2024 / week 4 - week 6
Sheryne Axellia Putri / 0367267 / Bachelor of Design (Honours) in Creative MediaInteractive Design
Project 1
TABLE OF CONTENTS
1. Lectures
2. Instructions
3. Reflection
LECTURES
Week 4 14.05.2024_The web & Structure
Web standards are the core set of rules for developing websites. It might be possible to develop sites that do not comply with standards, but doing so increases the likelihood that many people will be unable to access your site.
With the diversity in the way people access the web, there's a very high probability that your website will look different to many of your visitors than it does to you. Despite these differences, the most important part of your website is its content, and all users should be able to access that.
The central organization who is responsible for creating and maintaining web standards is the World Wide Web Consortium (W3C).
The W3C has defined dozens of standards, including the standard markup languages we use to build
websites. The standard markup languages we'll be using in this course are:
- HTML
- CSS
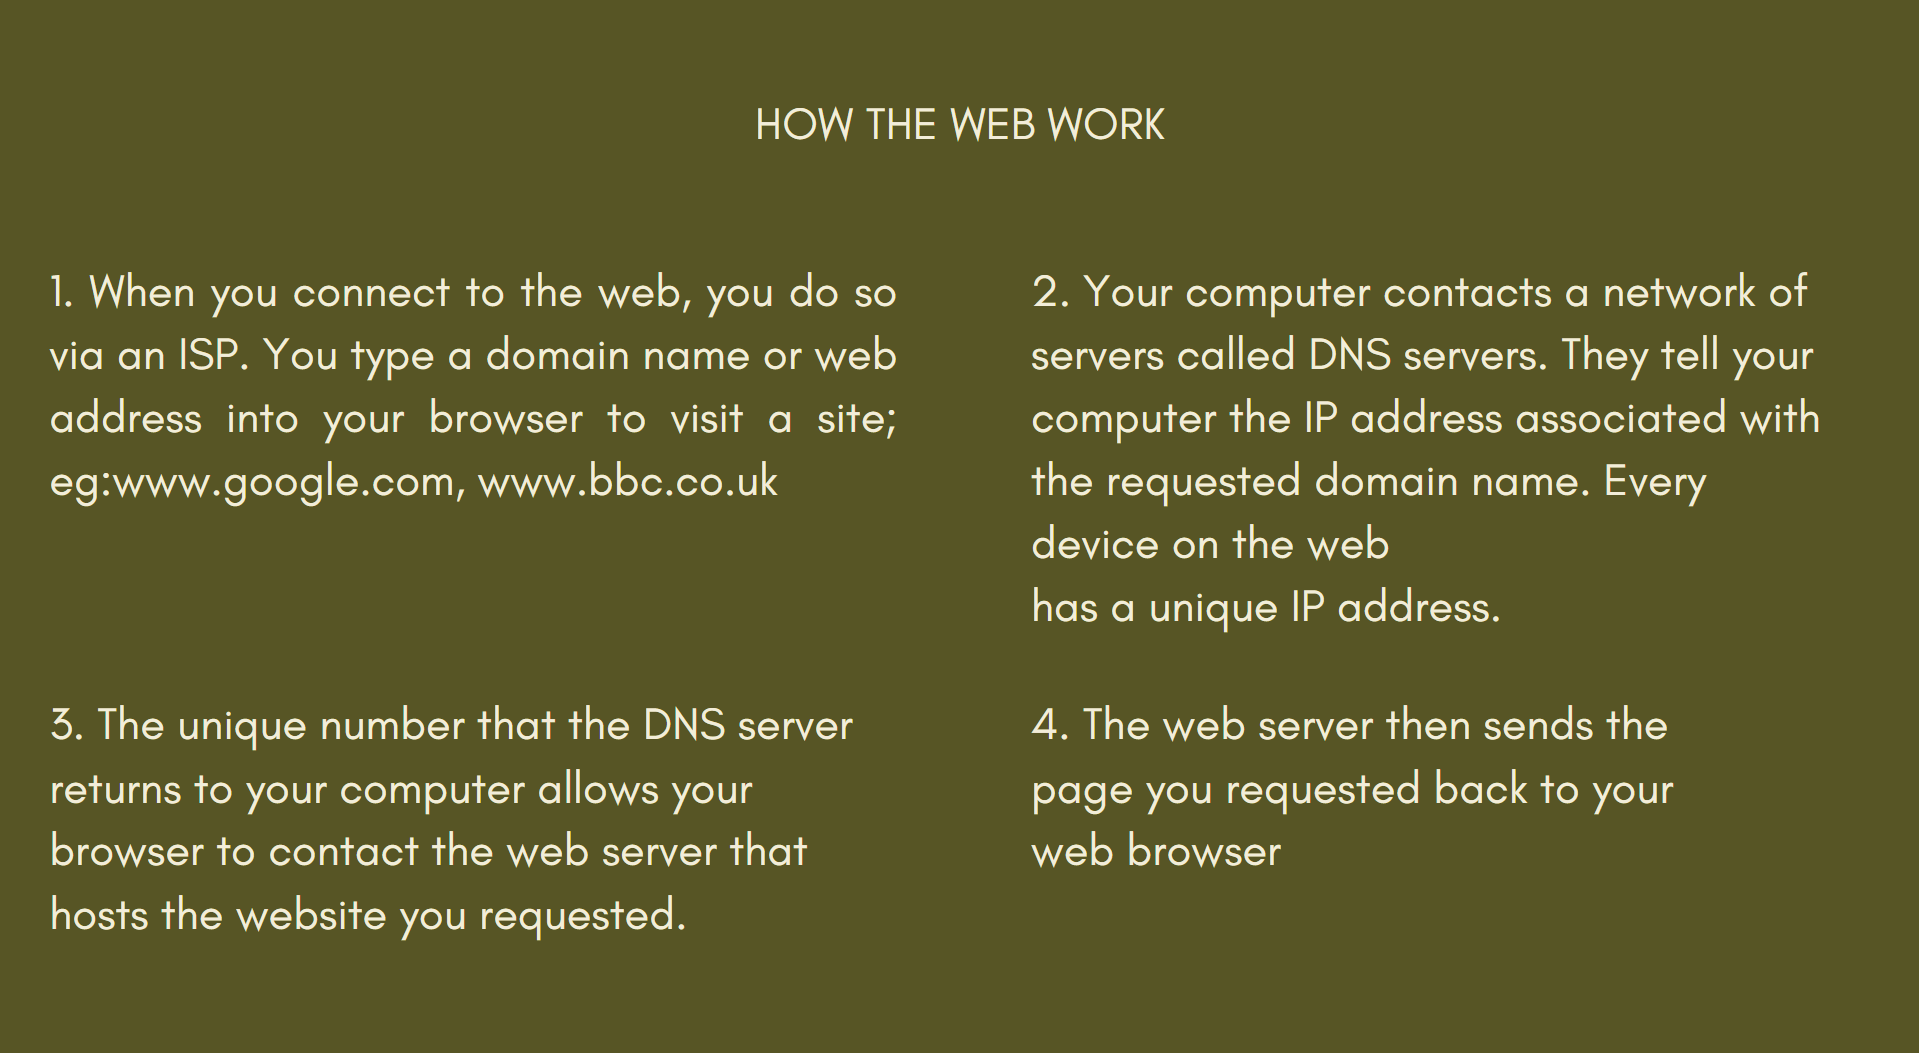
Figure 1.1 Week 4 (05/14/2024) How the web work.
HTML describes the structure of the pages
The HTML code is made up of characters that live inside angled brackets <> These are called HTML elements
Elements are usually made up of two tags: an opening tag and a closing tag

Figure 1.2 Week 4 (05/14/2024) HTML elements.
Each element tells the browser something about the information that sits between its opening and closing tags
- Opening Tag

Figure 1.3 Week 4 (05/14/2024) Opening tag.
- Closing Tag

Figure 1.4 Week 4 (05/14/2024) Closing tag.
- Attributes provide additional information about the contents of an element. They appear on the opening tag of the element and are made up of two parts: a name and a value, separated by an equals sign.

Figure 1.5 Week 4 (05/14/2024) Attributes.
*The attribute name indicates what kind of extra information you are supplying about the element’s content. It should be written lowercase.
*The value is the information or setting for the attribute. It should be placed in double quotes. Different attributes can have different values.
*Here an attribute called lang is used to indicate the language used in this element. The value of this attribute on this page specifies it is in US English.
- Body, Head &Title
<body>
You met the <body> element in the first example created. Everything inside this element is shown inside the main browser window.
<head>
Before the <body> element you will often see a <head> element. This contains information about the page. You will usually find a <title> element inside the <head> element.
<title>
The contents of the <title> element are shown at the top of the browser (tab bar).
- Headings
- HTML has six levels of headings:
- <h1> main headings
- <h2> subheadings
- If there are further sections under the subheadings then the <h3> element is used and so on.

Figure 1.6 Week 4 (05/14/2024) Headings.
- Paragraphs
To create a paragraph, surround the words that make up the paragraph with an opening <p> tag
and closing </p> tag.

Figure 1.6 Week 4 (05/14/2024) Paragraphs.
- Bold & Italic
Bold
- By enclosing words in the tags <b> and </b> we can make characters appear bold.
- The <b> element also represents a section of text that would be presented in a visually different way
(for example keywords in a paragraph).

Figure 1.7 Week 4 (05/14/2024) Bold.
Italic
- By enclosing words in the tags <i> and </i> we can make characters appear in italic.
- The <i> element also represents a section of text that would be said in a different way from surrounding content- such as technical terms, names of ships, foreign words, thoughts, or other
terms that would usually be italicized.

Figure 1.8 Week 4 (05/14/2024) Italic.
- Lists
Ordered lists are lists where each item in the list is numbered. The list is for the set of steps for a recipe that must be performed in order.
- The ordered list is created with the <ol> element.
-. Each item in the list is placed between an opening <li> tag and a closing </li> tag (the li stands for list item.)

Figure 1.9 Week 4 (05/14/2024) Ordered lists.
Unordered lists are lists that begin with a bullet point.
- The unordered list is created with the <ul> element.
- Each item in the list is placed between an opening <li> tag and a closing </li> tag (the li stands for list
item.)

Figure 1.10 Week 4 (05/14/2024) Unordered lists.
Nested lists
- You can put a second list inside an <li> element to create a sub-list or nested list
- In nested unordered lists, the browser will usually change the style of the bullet too.

Figure 1.11 Week 4 (05/14/2024) Nested lists.
- Links are the defining features of the web because they allow you to move from one web page to another.
- Links are created using the <a> element.
- Users can click on anything between the opening<a> tag and the closing </a> tag.
- Specify which page to link using the href attribute.

Figure 1.12 Week 4 (05/14/2024) Links.
Commonly type of links:
- Links from one website to another.
- Links from one page to another on the same website.
- Links from part of a web page to another part of the same page.
- Links that open in a new browser window (tab).
- Adding Image
- The <img> HTML tag serves the purpose of incorporating images into a web page.
- The <img> tag essentially establishes a designated space.
- It's worth mentioning that the <img> tag itself is void of content and is solely comprised of attributes, eliminating the need for a closing tag.
When using the <img> tag, two essential attributes must be included:
- src - This attribute specifies the path to the image.
- alt - This attribute provides alternative text for the image, which is essential for accessibility
- Title - This attribute provides a tooltip of the image in the browser

Figure 1.13 Week 4 (05/14/2024) Adding an img.
Week 5 21.05.2024_HTML & CSS
ID and Class attribute
- ID attribute
- Every HTML element can carry the ID attribute.
- It uniquely identifies the element from other elements on the page.
- No two elements must have the same value for their ID attributes (otherwise the value is no longer unique).
- Class attribute
- For example, you might have some paragraphs that contain more important information than others and want to distinguish between these elements.
- The class attribute on any element can share the same value or name.
By default, using these attributes does not affect the presentation of an element. It will only change its appearance if a CSS rule indicates it should be displayed differently.
- Block elements
- Some elements will always appear to start on a new line in the browser window.
- It is known as block-level elements.
- Example: <h1>, <p>, <ul> and <li>
- Inline elements
- Some elements will always appear to continue on the same line as their neighboring elements.
- It is known as inline elements.
- Example: <b>, <i>, <em>, <a> and <img>
Introducing CSS
CSS → allows you to create rules that specify how the content of an element should appear.
For example, you can set the background of the page as cream, all paragraphs should appear in gray using the Arial typeface, or all level headers should be in a blue, italic, Helvetica typeface. CSS works by associating rules with HTML elements. These rules govern how the content of specified elements should be displayed.
A CSS rule contains two parts:
- a selector.
- a declaration.
- CSS Style Rules with HTML Elements

Figure 1.14 Week 5 (05/21/2024) CSS style rules.
*This rule indicates that all <p> elements should be shown in the Arial typeface.
*Selectors indicate which element the rule applies to. The same rule can apply to more than one element if you separate the element names with commas.
*Declarations indicate how the elements referred to in the selector should be styled. Declarations are split into two parts (a property and a value) and are separated by a colon.
- CSS Properties Affect how Elements are Displayed
CSS declaration sits inside curly brackets and each is made up of two parts; a property and a value, separated by a colon.
You can specify several properties in one declarations each separated by a semi-colon.

Figure 1.15 Week 5 (05/21/2024) CSS declarations.
*This rule indicates that all <h1>, <h2> and <h3> elements should be shown in the Arial typeface, in a yellow color.
*The property indicates the aspects of the element you want to change. For example, color, font, width, height, and border.
*Values specify the settings you want to use for the chosen properties. For example, if you want to specify a color property then the value is the color that you want it to be for the elements.
- Method to employ CSS
Using External CSS
- The <link> element can be used in an HTML document to tell the browser where to find the CSS file used to style the page.
- It is an empty element and it lives inside the <head> element.
- It should use three attributes:
1. href → To specify the path to the CSS file
2. type → This attribute specifies the type of document being linked to. The value should be text/CSS
3. rel → Specifies the relationship between the HTML page and the file linked to. The value should be a stylesheet when linking to a CSS file.
- An HTML page can use more than one CSS style sheet.
- To do this it could have a <link> element for every CSS file it uses.
- For example, one author uses one CSS to control the presentation (fonts and colors) and a second to control the layout.
Using Internal CSS
You can also include CSS rules within an HTML page by placing them inside a <style> element, which usually sits inside the <head> element of the page.
- The <style> element should use the type attribute to indicate that the styles are specified in the CSS
- The value should be text/CSS
- You should use an external CSS style sheet when building a site with more than one page. This:
- Allow all pages to use the same style rules (rather than repeating them on each page).
- Keep the content separate from how the page looks.
- This means you can change the styles used across all pages by altering just one file (rather than each individual page).
INSTRUCTIONS
Figure 2.1 Week 4 (05/14/2024) Module Information Booklet.
Week 4 16.05.2024_The web & Structure
Objective: In this first part of the assignment, you will focus on creating a UI design prototype for your digital resume or curriculum vitae (CV) using prototyping software such as Adobe XD or Figma. The UI design prototype will showcase the layout, visual elements, and user interface interactions of your digital resume.
- Requirements:
1. Content and Structure:
- Prepare the content for your resume, including personal details, education, work experience, skills, projects, and other relevant sections.
- Decide on the order and hierarchy of sections based on their importance and relevance.
2. Layout and Visual Design
- Design the layout of your digital resume using the chosen prototyping software. Define the placement of different sections and how they will flow together.
- Apply a consistent visual design using typography, color palette, and appropriate spacing.
3. Sections and Organization
- Organize your resume into logical sections, such as "Profile," "Education," "Experience," "Skills," "Projects," and "Contact."
- Prioritize sections based on their relevance and significance to the position you're targeting.
4. Visual Elements
- Incorporate relevant images, icons, or placeholders that align with the content and enhance the visual appeal of your digital resume.
5. Prototype Presentation:
- Update your e-portfolio explaining and showcasing the processes of the task.
6. Evaluation Criteria:
- Clarity and effectiveness of the UI design, layout, and visual elements.
- Appropriateness of the chosen typography, color palette, and imagery.
1.1 Progress
1a. Mood board
I would like my CV to feature a clean and minimalistic design, with an emphasis on simplicity and elegance. These are the type of CV/resume layouts I prefer:

Figure 2.2 Week 4 (05/14/2024) Mood board.
The color Palette that I have chosen.

Figure 2.3 Week 4 (05/14/2024) Color palette.
1b. Sketches

1.2 Final Outcome

Figure 2.5 Week 5 (05/21/2024) Progress #1.

Figure 2.6 Week 5 (05/21/2024) Progress #2.

Figure 2.7 Week 5 (05/21/2024) Progress #3.

Figure 2.8 Week 5 (05/21/2024) Progress #4.
Figure 2.9 Week 6 (05/28/2024) Progress Final Outcome (pdf).
Figure 2.10 Week 6 (05/28/2024) Progress Final Outcome (Figma).
FEEDBACK
Week 5 21.05.2024
Specific feedback, for the top part make sure the elements are not too much or too distracting.
REFLECTION
Experience
In this project I mostly focused on using clear and concise language, and focused on highlighting my relevant accomplishments and experiences.
Observation
Utilized a clean and professional layout to present my information, making it easy for the reader to understand and comprehend, while also presenting a professional and polished image.
Findings
A concise CV shows you have a firm grasp on what's important in a CV/resume, and what to use to ensure your message to readers is effective. I also think that a structured resume can showcase your strengths at a specific industry.


Comments
Post a Comment